Core parameters:
1. Sampling rate 10k
2. Output voltage 1-24v
3. Current range 0.1uA-2A (instantaneous 5A)
4. Current resolution: 0.1uA
5. Voltage ripple < 10mv
6. uA accuracy: 1% ± 1uA
7. mA accuracy: 1% ± 0.2mA
Instructions
A. Buttons and interfaces:
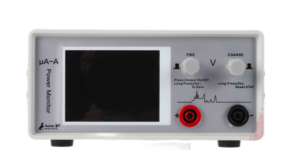
Front:
- LCD display
- Positive terminal (red)
- Negative terminal (black)
- Fine adjustment knob (left)
- Coarse adjustment knob (right)
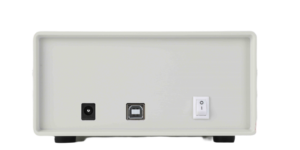
Back:
- DC interface
- USB interface
- Power switch
B. Buttons functions:
- Start output (left knob):
Connect the adapter, adjust to the appropriate voltage, and press the left knob to start the voltage output.
- Automatic calibration (left knob):
No load, press and hold the left knob for 5 seconds to automatically calibrate.
- Reset statistics (right knob):
Long press the right knob for 5 seconds to reset the statistical value.
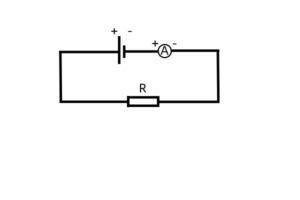
C. Operation as ammeter(optional):
- Set the voltage to 0.
- Connect the positive terminal of the battery to the negative terminal of the device, and the negative terminal of the battery to the positive terminal of the device.
- Start output (left knob). Connect the meter in series in the circuit to measure the current.
D. Host computer software(optional):
Download link: http://reejoee.com/download/EMK850x.zip
- Connect the device and start the collection. If the device is not connected, please refer to the FAQs.
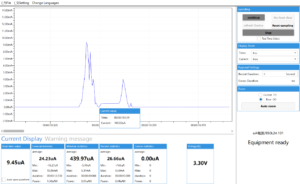
- Waveform area: View waveform and cursor
- View waveform: Pause waveform movement (click the Pause), press and hold the keyboard x or y key, scroll wheel, you can zoom in or out on the time/current axis, and view waveform details. (Can be set in the Display Zoom)
- Cursor use: Click the right mouse button once, click the right mouse button again, there will be two dotted line, and you can see the statistical values within the cursor range(statistical area).
- Statistical area: Statistics of current data in different time periods:
- General Statistics: Time from startup to now.
- Window Statistics: Statistics of the visible area of the window now.
- Recent statistics: The default statistics of the last 5 seconds. (Can be set in the Regional Settings)
- Waveform data export and save:
- Export CSV: Select File->Export to a CSV file.
- Save waveform data: In the Real-time value, select Auto save waveform, and the waveform file will be automatically saved to the ./data directory of the current directory (refer to FAQs for details).
- Schematic diagram of host computer software:
E. FAQs
- I want to see finer current details, how can I do it?
- In the host computer software, it has a Display Zoom. You can choose 1ms or 5ms, etc. (the default is 100ms), and there will be finer current details on the waveform diagram.
- If you feel that the waveform moves too fast, you can click the Pause.
- Can waveform data files be saved?
- Yes
- Select the Auto save waveform in the Real-time value.
- The data file is automatically saved in the current ./data directory, and the data file can be opened through the host computer software to restore the waveform diagram.
- Note, before opening the data file, first connect the host computer software to the Power Monitor.
- What should I do if the USB cannot be recognized?
- The data cable is directly connected to the USB port of the computer without hub.
- Check if there is a similar USB serial device (COMxxx) under Computer Management › Device Manager › Ports (COM and LPT), as shown in the figure below.
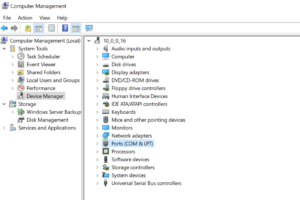
-
- If there are other COM ports, try to disable or uninstall it first.
- In the case of the above-mentioned COM port, if the host computer software still does not recognize it, restart the host computer software or switch the power button, or refresh the host computer software (the version after 2022).
- Check whether the USB cable is plugged in properly.
- If there is a question mark on the above COM port, you can turn off the Switch button and the system will automatically re-identify.
- How to use no-load clear?
- The parameters will be disordered if you operate a reset under load condition. Do not connect the load, reset it without load. Resetting is equivalent to automatic calibration current.
- No-load reset: in no-load condition, in the state of voltage output, press and hold the 0.01V knob (left side) for 5s.
- If you use win7 (64-bit)?
-
- After installing the .net and driver in Win7, restart the computer, whether it can run normally, it is recommended to use win10.
- Is the usage the same as that of a multimeter?
-
- Not the same, there are differences. The Power Monitor needs to be connected to an external DC power input, and then output through the Power Monitor to replace the battery of the device under test.
- Power Monitor is equivalent to a high-precision power supply.
- Why is there a negative number for the minimum value in the Window statistics?
-
- This negative value is generally uA-level, which is usually caused by the rapid charge and discharge of the capacitor on the circuit, and does not affect the statistical value.